ReCAPTCHA Setup Instructions
This guide provides step-by-step instructions for setting up Google reCAPTCHA V3 on your Salesforce site. Follow the steps below to integrate reCAPTCHA and enhance your site's security.
Sign Up for reCAPTCHA V3
To begin using reCAPTCHA V3, you'll need to sign up through Google:
- Go to the Google reCAPTCHA Admin Console https://www.google.com/recaptcha/admin/create
- Select reCAPTCHA V3 as the type of reCAPTCHA you'd like to implement. Ensure that the score-based (V3) option is selected.
- Add the domains where the reCAPTCHA will be used. For example, include both your internal and external Salesforce sites.
- After completing the form, click Submit.
You will be provided with a Site Key and a Secret Key. Save these keys as they will be required in later steps.
Salesforce Integration
Once you have the Site Key and Secret Key from Google, you need to configure your Salesforce Org.
- In Salesforce, go to Setup > Custom Settings.
- Find '3B Forms General Settings' and click to edit.
- Add the following details:
- Site Key - Enter the Site Key provided during the reCAPTCHA setup.
- Secret Key - Enter the Secret Key provided during the reCAPTCHA setup.
- Captcha Verify URL - Enter the following URL: https://www.google.com/recaptcha/api/siteverify
Add Trusted URL
To ensure smooth communication with Google’s reCAPTCHA service, you must add Google's URL as a trusted URL:
- In Salesforce, go to Setup > Trusted URLs.
- Add the following URL as a trusted URL: https://www.google.com
Enable reCAPTCHA in Forms
Now, configure the reCAPTCHA to appear in the forms:
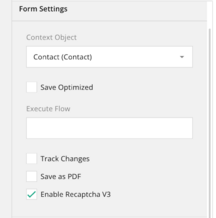
- Open the Form and go to the Builder tab.
- Under the Form Settings, check the box ‘Enable Recaptcha V3’.
- Save the changes.
Verify reCAPTCHA Integration
Once you've configured everything, publish the Form. The reCAPTCHA logo should appear at the bottom right of the page, confirming that reCAPTCHA is successfully integrated.


