Embeddable Screen Flow: Difference between revisions
Jump to navigation
Jump to search
(Created page with "== Intro == You can embed salesforce Screen Flows in 3B Portals using the "Screen Flow" component. Just drag and drop it into the canvas and configure the settings. == Builder Settings == When you click on settings against the dropped component on the canvas, you will need to configure the following: - Record Id - This can be the running context user's record id or any other custom record id. It will be passed to the Screen Flow's recordId input param (defaults to <now...") |
No edit summary |
||
| (2 intermediate revisions by the same user not shown) | |||
| Line 10: | Line 10: | ||
== Important == | == Important == | ||
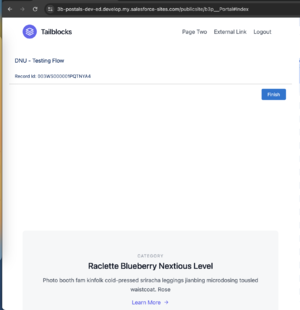
[[File:Screen Flow in Portal.png|thumb|Screen flow in portal]] | |||
There are a few things that you need to do to make sure that the screen flow renders and operates: | There are a few things that you need to do to make sure that the screen flow renders and operates: | ||
* Ensure that you have configured the flow to run as the System Administrator (under flow -> settings) | * Ensure that you have configured the flow to run as the System Administrator (under flow -> settings) | ||
* Ensure that the flow has a text variable "recordId" that allows inputs | * Ensure that the flow has a text variable "recordId" that allows inputs | ||
* Grant access to the page b3p__FlowEmbeddedComponent to the Site the portal is running on | * Grant access to the page b3p__FlowEmbeddedComponent to the Site/ Digital Experience the portal is running on | ||
* The site/digital experience has "Lightning Features for Guest Users" enabled | |||
== Security & Access == | |||
In order for a new Screen Flow to be accessible to 3B Portals, you need to follow these steps: | |||
# (Optional) If your Portal is running in a Guest Digital Community, make sure you have selected the "Guest users can see and interact with the site without logging in" option in the Digital Experience builder | |||
# Create a new Screen Flow | |||
# Set the "How to Run the Flow" in the Flow -> Settings to "System Context" | |||
# Go to the Flows list (Setup -> Flows) | |||
# Click on "Edit Access" against your flow | |||
# Click on "Override default behavior and restrict access to enabled profiles or permission sets." | |||
# Add the Guest User Profile(s) to the allowed profiles & Save the flow access settings | |||
# Go to the Site/Digital experience from Setup -> Sites | |||
# Click on Public Access Settings | |||
# Go to "Flow Access" and add your flow to the Guest User's profile | |||
Note: | |||
* Make sure that the Visualforce Page b3p__FlowEmbeddedComponent is also accessible to the Guest User | |||
* Repeat the above steps for every screen flow | |||
[[Category:3B Portals]] | [[Category:3B Portals]] | ||
Latest revision as of 01:51, 11 June 2024
Intro
You can embed salesforce Screen Flows in 3B Portals using the "Screen Flow" component. Just drag and drop it into the canvas and configure the settings.
Builder Settings
When you click on settings against the dropped component on the canvas, you will need to configure the following:
- Record Id - This can be the running context user's record id or any other custom record id. It will be passed to the Screen Flow's recordId input param (defaults to {{contactUser.Id}})
- Flow Name - This is the API name of the screen flow
Important
There are a few things that you need to do to make sure that the screen flow renders and operates:
- Ensure that you have configured the flow to run as the System Administrator (under flow -> settings)
- Ensure that the flow has a text variable "recordId" that allows inputs
- Grant access to the page b3p__FlowEmbeddedComponent to the Site/ Digital Experience the portal is running on
- The site/digital experience has "Lightning Features for Guest Users" enabled
Security & Access
In order for a new Screen Flow to be accessible to 3B Portals, you need to follow these steps:
- (Optional) If your Portal is running in a Guest Digital Community, make sure you have selected the "Guest users can see and interact with the site without logging in" option in the Digital Experience builder
- Create a new Screen Flow
- Set the "How to Run the Flow" in the Flow -> Settings to "System Context"
- Go to the Flows list (Setup -> Flows)
- Click on "Edit Access" against your flow
- Click on "Override default behavior and restrict access to enabled profiles or permission sets."
- Add the Guest User Profile(s) to the allowed profiles & Save the flow access settings
- Go to the Site/Digital experience from Setup -> Sites
- Click on Public Access Settings
- Go to "Flow Access" and add your flow to the Guest User's profile
Note:
- Make sure that the Visualforce Page b3p__FlowEmbeddedComponent is also accessible to the Guest User
- Repeat the above steps for every screen flow
